

Getting started has never been easier with Little Green Sprouts!
In this section you will find information on how to plan your garden, how to grow and how to teach with the garden. Remember, you can always take this garden learning any direction you want with your students. What is listed on the portal and in the manual are just suggestions! Have fun!
You’re ready to grow
You’ve set up your garden and are ready to plan your growing season! Use this section to plan out your growing season, prevent issues with your garden and decide what to grow and your harvest party!
Preventing Issues
You will want to inspect your garden each day for any signs of stress or issues. Keep your plant needs in mind as you inspect your garden and encourage your students to observe changes in the garden. Below are three helpful tips for preventing issues in your microgreen garden:
- Remove infected plant material immediately
- Always start with clean, disinfected equipment to help reduce the chance of microbial growth
- Avoid ‘over-seeding’ and over-watering, both will reduce the chance of fungal growth in your garden
Location
Choosing a Location for your garden can seem overwhelming. But find the best location you can in your classroom. See our Choosing a Location for Your LGS Garden section for more information.
Decide what to grow
See the Little Green Sprouts Planning Poster to help you decide which microgreens you would like to grow!
Download Stand Assembly Instructions
View or download the Stand Assembly instructions.

Step 1 – Assemble Materials
You will need all materials in your stand box, as well as your pair of strip light hangers and your Phillips head screwdriver.
The materials inside of your stand box will be:
-
- 2 -18” support bars
- 2 – bases for support bars
- 2 – light grips
- 2 – end caps for support bars
- 4 – height adjustment O-rings
- 2 – wing nuts (not present in all stand set-ups)
Step 2 – Place bases upright and insert the support bars
Ensure that support bars are sitting firmly in the bases.
Step 3 – Install one O-ring on each support bar
The O-rings are used to adjust the height of your lights by rolling them up or down the support bar. Use caution when stretching the rings over the support bars as the metal edges can be sharp.
Step 4. Install one light strip hanger onto each light grip.
Each light strip hanger will come with a stabilizer screw in the center of each hanger. Set the screws aside momentarily. Identify the square-raised middle section of your strip light hangers. This will be where you connect each light grip, by snapping it into place. After snapping one light strip hanger onto each light grip, secure the light strip hanger with your stabilization screws. Insert a screw into the bottom center hole of each light strip hanger. Screw into place using your Phillips head screwdriver.
Step 5. Install one light grip with attached light strip hanger, onto each support bar.
Ensure that your light grip is installed on the support bar so that the attached light strip hanger is on the same side as the flat edge of the base.
Step 6. Install one end cap onto each support bar.
Download Stand Assembly Instructions
View or download the Stand Assembly instructions.

Step 1
Remove the light fixtures from the packaging and inspect any for damage
Step 2
Remove light bulbs from fixtures
Step 3
Remove the protective film from the underside of the reflector on each light
Step 4
Install fixtures onto light strip hangers
Step 5
Re-install light bulbs into fixtures
Step 6
Install linking cord between lights and power cord
Download Stand Assembly Instructions
View or download the Stand Assembly instructions.
|
|
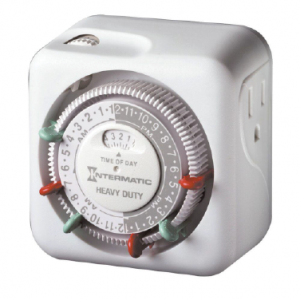
Timer with Independent Pegs |
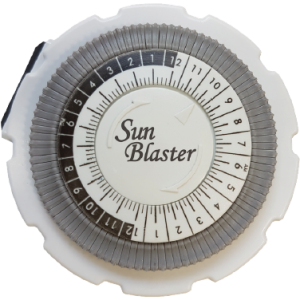
Timer with Depressible Segments |
 |
 |
|
Set Time of Day |
Turn the inside dial clockwise one full revolution then advance until arrow points at the current time. PM – Dark area |
Rotate the inner dial clockwise until the point points to the current time. |
Set the Timer |
Insert ON (green) and OFF (red) into dial slots at desired ON and OFF times. Do not insert trippers next to each other. Trippers must be pushed down firmly against the dial surface. |
Set the timer. Begin with all the segments pulled up. Push down the segment pins for required “ON” time. Ensure that any side switched on the timer is set to the timer position. |
Download Stand Assembly Instructions
View or download the Stand Assembly instructions.