

Planting
Growing Media
Indoor container gardening requires the use of a soilless growing media, commonly called potting soil, or pro-mix. Potting soil is light, does not compact, and has a high water-holding capacity without becoming water-logged – all important qualities to grow vegetables in a contained rooting area. Commercial potting soils also typically contain some ‘amendments’. These include clay minerals such as vermiculite or perlite (little white balls) which help to hold water and also provide some (but limited) nutrients. Most potting soils require the addition of fertilizer and dolomite lime for plants to complete their growth cycle. Be sure to adjust your added fertilizer levels if there is already fertilizer present in your potting soil.
Field soil (topsoil) or commercial compost should NOT be used for a variety of reasons, such as compaction and the likelihood of soil-borne disease.

Growing Media
View a 2-page overview from the teachers manual.
Maintenance
Once transplanted, it takes very little ongoing maintenance to keep your garden healthy. Whether you’re growing on a windowsill or under grow lights, your plants need basic needs – light, heat, water and nutrients to thrive. Remember your plants basic NEEDS to survive. As you care for your garden, consider whether it is having it’s basic needs met.
Use the acronym L.A.W.N.S. to remember your plant NEEDS.
- (L)ight. Are your plants receiving enough full sun or light? Are your grow lights placed too close to the plants?
- (A)ir. How is the air quality for your plants? Is it too cold or too hot? Your plants need airflow to grow healthy. If your plants are too crowded you can place an oscillating fan on your garden for a few hours each day to ensure that there is enough airflow.
- (W)ater. Are your plants receiving consistent moisture? Is the soil too dry? Too wet? Ensure that the bottom Earthbox reservoirs don’t dry out!
- (N)utrients. Do your plants have enough nutrients? Remember, too much fertilizer can be just as bad as too little fertilizer!
- (S)pace.
This list outlines some of the basic maintenance tasks for your garden.
This list looks long, but will take limited time if you and your students monitor your plants regularly! Consistent maintenance is an investment that pays off!
- Check water level in the boxes and in other pots.
- Fan young plants to help them become strong.
- Check if the plants need staking and ties.
- Prune tomato suckers as needed.
- Tidy up dry leaves
- Remove any and all diseased plant material.
- Quarantine any plants suspected to be unhealthy.
- Pollinate flowers (tapping or using a brush)
- Raise the lamp as the plants grow and if the top leaves look burned
- Occasionally check if the timer is still set to the appropriate time
Plant Needs Overview
One page overview of caring for plants and their needs.
Related Resources

Planting Seeds
You will either plant your seeds into peat pellets or directly into your containers (Earthbox, GrowBox), depending on the seed and your preference.
For tomatos, peppers, most herbs, cucumbers, squash beans and flowers, you will plant your seeds in peat pellets first, and then plant seedlings into your containers. Find peat pellet planting directions to the right.
You may choose to direct seed peas into containers or start in peat pellets, but be careful not to disturb their roots during planting. For lettuce and all root crops, you should seed directly into containers. Ensure that you follow the proper spacing and planting depth for your seed varieties, which you can find on seed packages or under the Seed Library tab. Generally, seeds can be planted at a depth of 2 times the length of the seed. After watering seeds, cover your peat pellet tray with your clear plastic dome to lock-in moisture. Check out the Germination (sprouting) tab above for more tips to ensure your seeds sprout.
Always remember to record your planting using the Seed Starting Log and label all planted seeds clearly.
For more detailed information regarding planting, refer to LGT Teacher Manual section Growing a Great Garden, or refer to relevant manual pages to the right under Guide.
Full Seed Starting Directions
Download or view the full seed starting directions from the LGT Teacher’s Manual
Related Resources
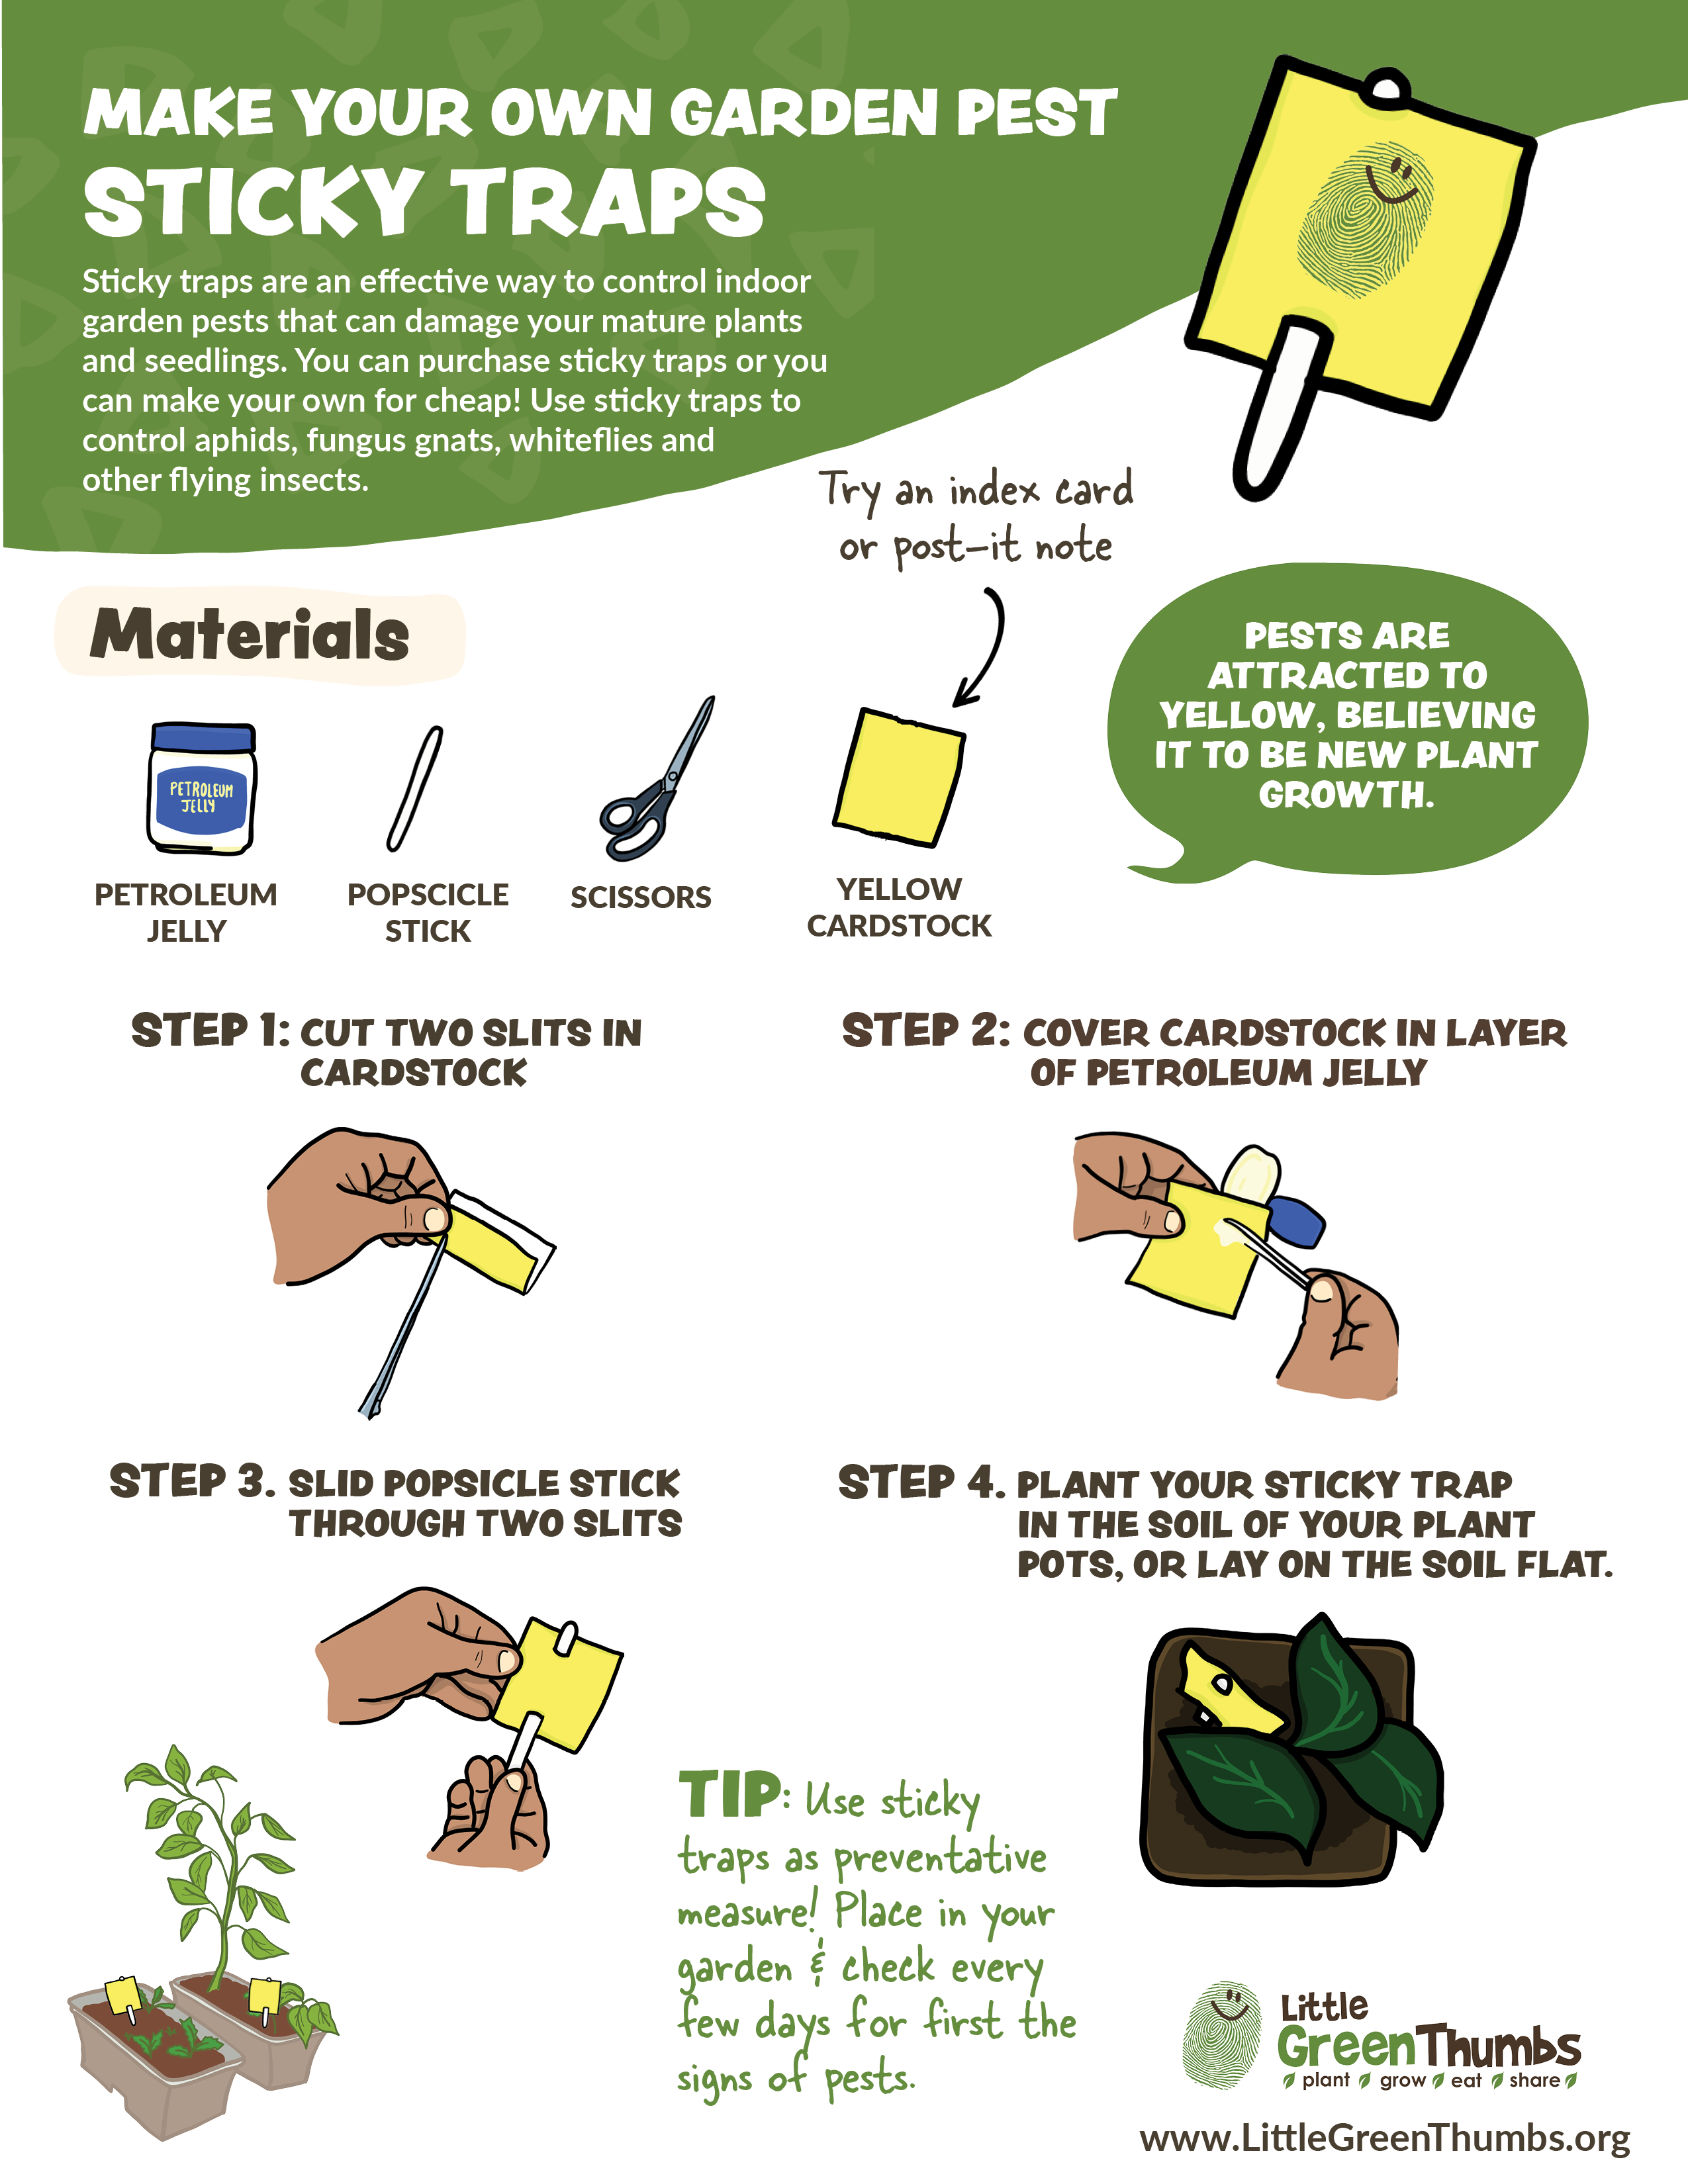
Preventing Pests
Important note: If you see a plant with any sign of infection or insect infestation on it, remove the infected plant part and dispose of it. Be ruthless! If the infection has taken over the entire plant, remove the whole plant if you can.
Prevention is the first step in fighting pests and disease in your indoor garden. Here are a few simple tricks to greatly improve your chances at a trouble-free crop:
- Before starting your indoor garden, inspect all plants you may already have in your classroom and discard any that are diseased.
- Inspect your plants daily, including the underside of the leaves occasionally, checking for potential problems.
- Keep air flowing through the leaf canopy by using your oscillating fan.
- Don’t handle plants when they are wet.
- Ensure your pots are clean and sterilized each year before bringing them into the classroom.
- Keep plant stress levels low – this means maintaining adequate soil moisture, consistent light intensity and sufficient fertilization. When plants are grown under stressful conditions (such as low light and excess water), soil-borne pathogens are more likely to develop.
- Buy or make your own STICKY TRAPS immediately upon planting into your Earthboxes as an early warning sign for pest issues.
Please choose your video:
Preventing Pests & Making Sticky Traps
Preventing Pest Issues
A short overview of prevention tips and plants’ needs from LGT Teacher Manual chapter 3 Growing a Great Garden.
Related Resources
Pollinating
In nature, bees, insects, and birds pollinate plants so they can bear fruit. In the classroom setting, keeping the oscillating fan on the plants will certainly help (it helps shake pollen free on self-pollinating flowers), but students can pollinate some of their plants including tomatoes, cucumbers, and peppers to ensure greater success!
Tomatoes
Pollinating a tomato is very simple – all you do is gently tap or flick the flowers once a day. Tomatoes are self-pollinating, which mean that both the female and male parts are on this flower. See Self-Pollinating instructions to the right.
Peppers
Peppers are also self-pollinating, meaning the female and male parts are in the same flower. Recommendations on pollinating peppers vary. Most home gardeners report great success pollinating them like tomatoes – just flick or tap the flower. See Self-Pollinating instructions to the right.
Cucumbers
You’ll need to know what variety of cucumber your seedling is to know if they need to be pollinated! The greenhouse variety of long English cucumbers we have with the LGT kit (Diva Hybrid) produces female flowers only (with small immature cucumbers located directly behind the petals) and set fruit without the need of pollination. Other varieties that produce both male and female flower might need hand-pollination. A fine art brush or toothbrush can be used to pick up pollen from a male flower and transferred into the female flowers. You can tell which flowers are female because they will have tiny cucumbers between the flower and the vine. Cucumbers tend to grow several male flowers that will naturally die off before producing any female flowers, so be patient with them. See instructions for pollinating male/female flowers.
Staking or Trellising 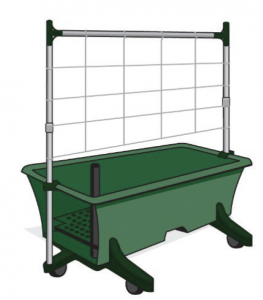
A stake is nothing more than a rod made from wood, plastic or metal. It is inserted into the soil, and a growing plant is
tied to the stake, preventing the plant stalk from flopping over. Staking is generally required for plants that have a vining growth habit (as opposed to bush-type varieties), or for plants that you would like to prop up and keep off the ground. You can also use string or twist-ties to ensure the vine stays attached to the stick.
Trellises come in two basic forms. One is a mesh or net of wood, metal, plastic or fabric that stands as a wall behind or amid the plant that requires support. Another effective method (especially for beans and cucumbers) is to tie twine or string to the ceiling and allow the vine to attach itself and climb up the twine. The growing plant is then tied to the lines for support.
In your Little Green Thumbs garden some form of support will be necessary for your pole beans, cucumbers, indeterminate tomatoes and peas. You will probably not need to stake your Tiny Tim or Red Robin tomato varieties, as they are determinate, compact plants. If they are growing extra large and you want to prop them up, consider using a stake.
For Garden Set-up #1, an Earthbox or Growbox trellis can be used. If you are using Garden Set-Up #2 or a cart, you will be able to attach a trellis directly to your cart.
Staking & Trellising information (from Teacher's Manual)
View or download one-page overview from the LGT Teacher’s Manual.
Transplanting
Some of our LGT teachers will plant their peat pellet seedlings directly into their growing containers (Earthbox, Growbox), while some teachers might plant seedlings in peat pellets into black plastic 4” planting pots first (and then plant into the Earthbox/Growbox).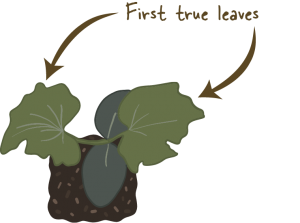
Once the plants have achieved height of 10 cm (2nd or 3rd set of true leaves), you can transplant from peat pellet seedling into larger growing containers (Earthbox, Growbox). This will generally take about 4-5 weeks of growing. We recommend planting peat pellets into 4” black plastic pots first, as they will not dry out as quickly as peat pellets. You can plant peat pellet seedlings into black plastic pots as soon as your first true leaves appear.
Have the students choose only the strongest plants for transplanting. It’s best to transplant several of one type and then, once established, thin the weaker plants. Once transplanted into their new soil, the transplants should be lightly watered from the soil surface for 3-5 days until its roots become more established.
Transplanting Tips
Download or view a one-page overview from the LGT Teacher’s Manual
Using Fertilizer
Always check your particular fertilizer brand for correct application rates or get in touch with your local Little Green Thumbs coordinator!
Fertilizer provides nutrients to the plants, which is absorbed through a plants roots. In our LGT garden, we will use a mix of liquid fertilizer, granular fertilizer and vermicompost, depending on the stage of growth. Always follow the directions on you fertilizer container, or directions given to you from your LGT coordinator for fertilizer application rates. Rates will usually vary by product, so ensure that you know. Over-fertilizing can be as harmful as under-fertilizing.
Nitrogen (N), Phosphorus (P) and Potassium (K) are considered macronutrients and are needed in greatest supply. These nutrients are represented by the 3 numbers on your fertilizer bag (ie. 10-10-10 or 4-8-4). These numbers represent the % by weight of each nutrient in your soil. Many other nutrients are required in smaller quantities and are termed micronutrients. One important micronutrient is Calcium (Ca), which will be added through the addition of dolomite lime. Dolomite is essential in peat-based soils to maintain a neutral soil pH, balancing out the natural acidity of the peat.
You will start fertilizing with liquid fertilizer only after the “first true leaves” appear on your seedlings. The first leaves that will appear on the plant are called cotyledons, and are actually part of the seed that contains food for the baby plant’s early development. The cotyledons are often round leaves, while the “first true leaves” will resemble the leaves of the mature plant. Always dilute your liquid fertilizer to half strength for your baby seedlings, and fertilize no more than once per week.
You will mix your dry granular fertilizer and dolomite in with your potting soil when planting in your containers (Earthbox, Grow Box). You may also use a mix of your vermi-compost when you are filling your growing containers. You can add up to 25% of the volume of your container with vermi-compost. Adjust your granular fertilizer application rates accordingly. Please find the correct download rates from your local LGT coordinator for your particular brand of fertilizer.
Please use caution, fertilizer is made of concentrated mineral salts and chemicals that could be dangerous in ingested. Store fertilizers out of the reach of children and discuss safety issues with your class.
Using Fertilizer
Download or view a 2 page overview from the LGT Teacher’s Manual.
Related Resources

Using Your Grow Light
We use grow lights in our LGT gardens because the sun is often not strong enough during the winter and through a window, to grow fruiting plants. There are several different lights being used in LGT gardens.
The most important considerations when using your grow lights are:
- adjusting the height of the lights, and
- controlling the light duration.
Dry or scorched leaves can be a symptom that lights are too close to plants, while ‘leggy’, weak stemmed plants can be a symptom of lights being too far away. You will want to keep your lights at a certain height above the top canopy of your plants, depending on the type of light that you are using. Generally this is 4 inches above the plant canopy for LED and Fluorescent tube lighting and 2-3 feet for your Metal Halide light. You may need to place some of your shorter plants on top of upturned pots or a table to raise them up.
Outdoor vegetable gardens generally require 6-8 hours of sunlight a day, while your indoor garden will require 12-16 hours of sunlight a day. We suggest setting your timer to a cycle of 12 hours of grow lights on, 12 hours off. More light does not automatically cause plants to produce more. Plants actually require darkness each day for respiration to occur (respiration is the process by which plants convert the products of photosynthesis to usable energy). Some gardens will adjust the amount of light throughout the growing season to mimic the natural season, and inspire plants to set fruit.
You might try to grow some seedlings in your window as an experiment. The amount of light you have in your window depends on the direction it faces. Because light comes from only one direction, plants will often lean towards the light. You will need to rotate your plants every few days. You could investigate this movement towards the light, called phototropism, with your class.
Vacation Prep
One of the trickiest obstacles in your classroom garden is managing holidays! But, don’t despair! A Little Green Thumbs garden is designed to let you leave your garden over weekends and week-long school breaks. Try these simple tips to make sure your classroom garden stays healthy.
Last, but not least – ensure your vermi-composting worms have been fed before you go, and check your bin moisture level. If it is too dry, add some water. If it is too wet, add some extra newspaper bedding.
Now, enjoy your holidays! Bon Voyage!
1. Fill your water reservoirs
The simplest tip: remember to fill your water reservoirs below your growing boxes right before you leave for vacation!
2. Transplant seedlings into larger containers
Planting seedlings will help prevent them from drying out. Remember to water them well once you plant them in the larger containers.
3. Place damp newspapers over the top of soil
Place a few layers of damp newspaper on soil as mulch, to prevent evaporation.
4. Trim foliage of mature plants the day before leaving
Trim foliage of mature plants the day before leaving so they will require less water during your absence.
5. Build a mini greenhouse over your potted plants
Cover your smaller pots with a transparent plastic bag, lifted with bamboo poles. Poke a couple holes in the bag for oxygen.
6. Use sticky traps to check for pests the week before
Place a few sticky traps in the garden & monitor for a few days to ensure there are no signs of pests. If you do see pests, begin treating with our soap spray recipe (link to on resource pace). Remove affected leaves, and if needed, remove the entire plant in case of serious infestation.
7. Check your timer
Double check that you timer is set for 8-12 hours of light each day.
Vacation Prep
View or download a one-page overview
Preventing Issues in the Garden
You will want to inspect your garden each day for any signs of stress or issues. Keep your plant needs in mind as you inspect your garden and encourage your students to observe changes in the garden. You will find more guidance for dealing with issues in the Troubleshooting section of this manual and on the Teacher Portal, but there are a few best practices that can eliminate the risk of many issues in your garden.
- Remove affected plant material immediately. This is your best defence against problems in your garden. Be ruthless! If it looks unhealthy or infected, get rid of it before it spreads.
- Always start with clean, disinfected equipment to help reduce the chances of microbial growth in your micro-garden. Disinfect your growing equipment after use and before reuse.
- If you opt to use seeds other than those provided (we encourage experimentation!), select only untreated seeds. The inoculant coatings are great in outdoor settings but are not appropriate for microgreen or student-planted crops.
- Always use fresh, clean water to avoid contamination.
- Avoid over-watering during the growing phase of microgreens and lettuce, to prevent fungal growth.
- Avoid ‘over-seeding’ microgreens and lettuce in order to keep plant density low and promote air circulation, thereby reducing fungal growth.
- Use an oscillating fan if your potting mix becomes too moist or you have limited airflow in your classroom.
- Avoid letting your growing medium dry out completely- this will result in stunted or halted germination and is difficult to restore.
- When growing lettuce greens, don’t be afraid to thin the crowd early on. This can be your first harvest! Thinning allows for more air circulation and prevents fungal growth.
- Create a space for the plants to grow that will receive minimal disturbance from heavy foot traffic.
- Place your garden away from any cool drafts.
- Have students wash their hands prior to working with plants and before harvest or food preparation.
Watering Your Garden
Proper watering, especially in container environments, is critical for vigorous growth and fruit production. The self-watering containers (Earthbox, Grow Box) are designed so that the user doesn’t need to assess moisture levels or decide how much to water – essentially the plants take up what they need from the water reservoir under the container! You will want to place your clear plastic dome over your seedlings when you leave for the weekend, to ensure moisture levels in your plants. For small seedlings, we recommend watering plants from below by adding water to the bottom tray and allowing plants to soak up what they need. Ensure any standing water is drained after one hour.
To avoid any issues of over- or under-watering, a few key pieces of information will be helpful for you and your students:
- The basin of the Earthbox container has a capacity of 12 liters
- Water is absorbed by the potting soil in the two corners where it was packed down because of the wicking properties of soil
- When plants are small, add water approximately once per week. As they grow and mature, you will need to add water more frequently (3-5 days), eventually watering every 2-3 days for heavily fruited plants.
- DO NOT let the reservoir go dry, as it will interrupt the upward flow of water to the roots. Think of a using a sponge that has completely dried out to mop up a spill – it loses it’s ability to soak up water!
- Placing a small container underneath the overflow holes of the growing container
- Always water the container via the water access tube – the only exception is for a few days immediately after transplanting where it is helpful to water plants at their base to ensure roots are in moist soil
Watering Tips
Download or view a one-page overview from the LGT Teacher’s Manual