

Diagnosing the Issue
Most common symptoms
Don’t know what your garden issue is? Here are the top 10 most common symptoms in your garden, along with their potential causes and solutions.
My plants are weak and spindly
Possible Cause |
Solution |
| Light is too far from plants | Ensure light is proper distance from plant canopy. For LED, 3.5 inches above; for fluorescent, 4 inches above; for MH, 1-2 feet. |
| Excess nitrogen. | Avoid fertilizing. |
| Plants are crowded. | Ensure plants are spaced appropriately. Check spacing for different plants here. |
| Plants have too much water. | Ensure proper drainage for containers. Ensure plants are not in standing water. Avoid over-watering, allow soil to dry. |
My seeds didn't sprout after planting.
Possible Cause |
Solution |
| Not enough time has passed. | Check your seeds for the ‘Days to Germination’. You might have to wait a bit longer for those particular seeds to sprout. |
| Soil is too dry. | Make sure your seeds stay moist while you wait for germination. So, water! |
| Soil is too wet or waterlogged, and seeds have rotted. | If this is the case, you may need to replant as seeds will have rotted. |
| Your seeds are too old, or have gone bad. | You can try a ‘germination test’ to see how viable your seeds are. |
| Temperatures are too cold. | Seeds will not sprout if temperatures are too cold. Ensure there is no draft near your seeds. If needed, you can wrap your seed tray in a towel or place a heat mat under your tray. |
My seedlings are young plants are wilting and falling over.
Possible Cause |
Solution |
| Dry Soil | Keep soil evenly moist. Try to bottom water seedlings when growing indoors. |
| Damping off (fungal disease) | Avoid over-watering and use only sterile planting mix. |
| Soil too wet so roots/stems rotting or can’t access oxygen. | Let soil dry out. |
| Fertilizer burn. | Ensure proper amounts of fertilizer used and follow fertilizer directions. If too much soil has been added, you may need to dilute the amount of fertilizer by removing some soil/fertilizer mix and adding fertilizer only. |
| Seed is too old. | Ensure that your seed is still viable. Try a simple germination test to see if your seeds are still good to use. |
My plants are wilting.
Possible Cause |
Solution |
| Lack of moisture in soil. | Water deeply, thoroughly. Ensure that water reservoir under planting containers are full. If soil is too dry, you may need to water from the top again to re-activate the wicking property of the soil. |
| Soil is too wet or waterlogged, lack of water drainage. | Let soil dry out. Do not water and use an oscillating fan. Improve drainage on your containers. |
| Root Rot (fungal disease) | Ensure that you are using fresh soil in containers. Do not overwater. |
| Vascular wilt (fungal disease affecting tomatoes, peppers, eggplant and potatoes) | These are soil borne diseases which are less common indoors (unless carried in from outdoor soil/plants). Eliminate affected plants and the soil they are planted in. Ensure that fresh soil is used in planting containers. |
| Insect Infestation | Check your plants for signs of pests. Make sure to look underneath the leaves. Give the plant a shake to see if you see any bugs. If you do – look in the section for Top Controls for Garden Pests. |
My plant's leaves are pale yellow, and plant growth is stunted.
Possible Cause |
Solution |
| Insufficient Light | Ensure plants are placed under the grow lights, or are receiving full sun for at least 8 hours a day. |
| Temperatures are low | Ensure that plants are not receiving a draft. If placed near the window, you can insulate the window with a few sheets of newspaper, or move the garden away from the window. |
| Nutrient Deficiency | Yellowing leaves can be a sign of nutrient deficiency. Check to ensure you have applied the correct rate of fertilizer. If in doubt, try adding vermi-compost. |
| Too much water | Reduce watering until soil dries. |
| Insects or Disease | Check your plants for signs of pests. Make sure to look underneath the leaves. Give the plant a shake to see if you see any bugs. If you do – look in the section for Top Controls for Garden Pests. |
Leaves are mottled yellow and green, mosaic pattern.
Possible Cause |
Solution |
| Viral disease | Remove and destroy infected plants. Remove plant debris. |
There are brown spots on my plant leaves.
Possible Cause |
Solution |
| Fertilizer burn | Ensure that proper fertilizer rates are always used. Fixing over-fertilization is possible, but can take time for plants to restore to health. You will want to ‘leach’ the fertilizer from the soil. For container grown plants, use room temperature distilled water and fill the container to the top edge. Allow all the water to drain from the plant. Large containers will take quite a while to drain so have patience. Repeat this at least 4 times. Excess fertilizers will be washed from the soil and drain into the bottom of the container. Discard this excess water from the bottom reservoir. |
My plants are flowering but no fruit appears.
Possible Cause |
Solution |
| Lack of Pollination | If you are seeing no fruit after setting flowers, ensure that your plants are pollinating. Check these directions for pollinating your garden plants. |
| Temperatures are too low | Ensure that the plants are not receiving a draft. If placed near the window, you can insulate the window with a few sheets of newspaper, or move the garden away from the window. |
| Plants are not mature enough | Sometimes it takes more time than you think for fruit to appear once you see the first flowers. Check the “Days to Maturity” on your seed packet. Has enough time passed? You may have to just wait. |
| Plants too close to Metal Halide or fluorescent light | If you are using the LGT garden with the Metal Halide light (with a cooling tube and ducting), ensure that your plants aren’t too close to the light, as the heat can cause problems with pollination. Try the “back of hand” test as a general rule. Hold your hand just above your plants and hold there for 30 seconds. If your hand gets too hot for comfort, the light will be too hot and you want the light higher. If your hand could be closer without discomfort, you can bring the light closer. You want your hand to get hot, but not unbearably so. |
My seedlings have a white fuzz on them.
This is a common issue for many people who start their plants from seed. The good news is that this white fuzz is harmless to your plants and people; however, it is probably an indication that your soil is too wet. Soil that is too wet will eventually hurt seedlings. Once you restore the conditions, the fuzz will disappear, or you can simply remove it by scraping it with a knife or spoon.
Possible Cause |
Solution |
| Too much water | Refrain from watering until the soil in your seedlings has dried. Try to water seedlings from the bottom of the seedling container, not on top of the soil. This not only encourages the roots to grow deeper, it also helps alleviate mold and fungus because the surface of the soil is not constantly moist, so it cannot grow. |
| Not enough light | Ensure seedlings are placed in direct light and receive 12 hours of light each day. |
| Not enough airflow | Increase the airflow around your seedlings. You can do this by having a fan running nearby for at least a few hours a day. Not only does this help prohibit fungal growth, but it also results in sturdier seedlings. |
Most Common Environmental Disorders
Not sure what’s causing the issue? Download the Environmental Issues Diagnosis Chart for assistance with diagnosis in the classroom.
Too Much or Too Little Water
Proper watering is crucial for the health of your plants. Earthboxes and GrowBoxes have been specially designed to allow the right amount of water to wick up in the soil to your plants, from the water reservoir below. Don’t let your water reservoirs dry out! If the reservoirs go completely dry and the soil has dried out, it will be very difficult for soil to wick water. Water-logged soil may be a symptom of an improper soil mix being used in your growing containers. Ensure that you are using a potting mix, not topsoil or pure compost. Your mix should be peat-based (70%-80%) that contains perlite or vermiculite. It should be light and fluffy when dry, and spongy when wet. The symptoms over under-watering often mimic over-watering, so be sure to investigate your soil. It may be dry on the surface, but should have moisture 2.5 inches down.
Lack of Water
Symptoms |
Solution |
|
|
Over Watering or Poor Drainage
Symptoms |
Solution |
|
|

Too much water or not enough? They can look very similar so check your soil!
Too Much or Too Little Light
Providing proper light to your garden plants is critical to the success of your indoor garden. You will want to consider your light duration and light intensity. Make sure to follow the height recommendations for your lighting kit. Light should be on for at least 12 hours a day in your indoor garden, but ensure that plants receive a dark period too.
Too much light/sun scald
Symptoms |
Solution |
|
|
Light Intensity is Too Low or Lights Too High From Canopy
Symptoms |
Solution |
|
|

Overcrowding and Space Issues
Roots and foliage take up space. Each plant has their own specific space requirement needs. Plants that are spaced too close together will be stressed as they compete for their basic needs, resulting in weaker plants, higher susceptibility to diseases and insects, and ultimately poor food production. Plants also require air circulation.
Size of pot is too small
Symptoms |
Solution |
|
|
Plants are crowded
Symptoms |
Solution |
|
|

Air Temperature and Humdity
Temperature is a factor that often goes unnoticed. We tend to assume that are plants are safe indoors; however, window sills can get cold at night or if temperatures drop in the evening. Low temperatures can cause defoliation, brown leaf tips, and yellowing leaves, so make sure you rule out this problem as you troubleshoot.
Temperature too cold
Symptoms |
Solution |
|
|
Humidity too high
Symptoms |
Solution |
|
|
Humidity too low
Symptoms |
Solution |
|
|

Nutrient Deficiencies
Plants must take up nutrients from the soil to support their health and growth. Because we use a sterilized, soil-less potting mix for indoor gardens, it is important that nutrients are added. Some potting mixes contain added nutrients, but if not, you will need to add compost or fertilizer to your garden. This is best added at the time of planting, though you may need to supplement nutrients again during the growing season. Plant roots also require certain conditions to obtain these nutrients from the soil. The most important of these is that the soil must be sufficiently moist to allow the roots to take up and transport the nutrients, but not waterlogged so as to prevent absorption.
Too Much Fertilizer
Symptoms |
Solution |
|
|

Most Common Pests
Aphids
What they look like: Aphids, also known as plant lice, come in different colours like grey, black and green. They cluster on the underside of leaves and suck the sap from them. They can be found anywhere on the plant, but often congregate along its stems. Like whiteflies, they excrete a sticky substance referred to as “honeydew,” in which black sooty mold grows.
Symptoms: Leaves develop yellow spots, then wilt. Black mold growing on top of leaves. Aphids weaken plants by sucking the juices out of their leaves and turning them yellow.
Control: Use an insecticidal soap spray made from dish soap, water and vegetable oil. Find directions on the ‘Control’ page. Be sure to target the pests on the bottom of leaves, too.Aphids produce as many as 12 new offspring per day. You will need to use two-three applications of soap spray. Once now, and once in 3 days and then 5-7 days to get the next generation.
Prevention: Use sticky traps and check daily for signs of pests. Check underneath leaves every week to catch any new infestations.

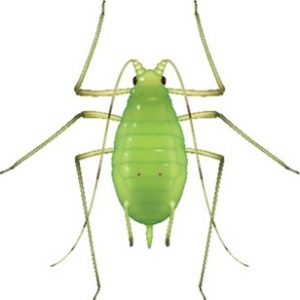
Aphids can be grey, black or green. They cluster on the underside of leaves and suck the sap from them. They can be found anywhere on the plant, but often congregate along its stems.
Fungus Gnats
What they look like: Adult fungus gnats are small and black with thread-like antennae, long slender legs and clear wings. Fungus gnats look similar to fruit flies. Fungus gnats lay their eggs in moist soil where the larvae will hatch and feed on small roots, fungus and other organic matter in the soil. They have no interest in fruit. If you see tiny black bugs in plant soil, and flying around your plants – those are fungus gnats. The larvae can be clear or cream-colored with shiny black heads that look like small black specks to the naked eye and grow about a ¼-in. long.
Symptoms: The flying adults do not cause damage to the plant, but they lay eggs in the growing media and are a nuisance. The larvae do feed on the roots, making the plant weak and slow-growing, which can eventually lead to harm for your plants
Control: The most common way fungus gnats get into your garden is through soil of a purchased plant or the bag of potting soil you use. The first thing to do is to control soil moisture. Fungus gnats thrive in moist soil and can’t survive in dry soil. Apply insecticidal soap spray onto op your soil to kill gnats in potted plants. This is effective after a few applications. Lastly, you can replace the top inch of your soil with a fresh layer of potting soil, followed by a layer of sand. This will control the gnats in the soil and deter them from laying eggs.
Prevention: Do not reuse potting soil from year to year. Always use fresh, sterile potting mix when repotting plants. Use yellow sticky traps, which will attract and capture adult fungus gnats. This will not take care of the problem of fungus gnat larvae but it will be an early warning sign of a problem.

Mealy Bugs
Mealybugs are tiny white bugs on houseplants, and most commonly look like white fuzzy stuff on plants leaves and stems. Mealybugs can also appear brown or cream colored, and waxy in immature stages. At first glance they don’t look like insects, and are commonly mistaken for fungus or mildew rather than plant bugs. If the white bugs you see on your houseplants look more like tiny white flies that fly around when the plant is disturbed, then those are whiteflies instead of mealybugs. The first step is to quarantine your infected plant if you can.

Thrips
What they look like: Thrips are hard to see at a mere 5-mm long. They can be yellow, brown or black. To the naked eye, they look like tiny threads.
Symptoms: They leave fecal droppings on plants that appear as black spots. Females bore holes in leaves where they lay their eggs. If your garden is infested with thrips, leaves will eventually look dry—not wilted—and have yellowish spots. Look for silver or bronze colored streaks on leaves, which eventually turn brown, dry and crumbly. The pests feed by puncturing plants and sucking out the sap inside, creating the streaks.
Control: Remove any infected plants if you are able. Use an insecticidal soap spray made from water, dish-soap and vegetable oil (Directions on page ##).Repeat the treatment two to three times at 7- to 10-day intervals to ensure you’ve eliminated all of the pests and any new generations hatching.
Prevention: Check often for the presence of thrips by giving plants a gentle shake. The larva are wingless and will leap when jarred.

Spider Mites
What they look like: Spider mites, at less than 1-mm long, are tiny relatives of spiders with eight legs and oval bodies. Spider look like grains of sand and are found mostly on the undersides of leaves. Eggs are round and clear and become a creamy color just before hatching. If you see white webbing, you most likely have an infestation.
Symptoms: Spider mites mouthparts pierce and suck, causing damage by puncturing plant cells, resulting in fluid loss that eventually kills plants. An adult female can lay up to 20 eggs per day, causing infestations quickly.
Control: Isolate infested plants from others and spray them with a formula that kills the eggs and the larval stages as well as the adults. Use an insecticidal soap spray made from dish soap, water and vegetable oil. You will need to use two-three applications of soap spray. Once now, and once in 3 days and then 5-7 days to get the next generation.
Prevention: Spider mites often travel from garden to garden on nursery seedlings. Make sure to inspect any seedlings before planting in your garden.

Whiteflies
What they look like: Whiteflies resemble small, white moths and are about 1-mm long that cluster on the underside of leaves. The nymphs are translucent and can appear to be the same colour as the leaves. Like aphids, whiteflies secrete honeydew that is colonized by black sooty mold.
Symptoms: Look for stunted or twisted leaves, white spots or black moldy areas on the top of foliage.An adult’s mouth parts pierce and suck juices from plant leaves, causing white spots and yellowing. Females lay their eggs on the undersides of leaves. Another downside to whiteflies is that they secrete a sticky substance called honeydew, which is a breeding ground for sooty mold.
Control: Trim or remove infested and damaged plants or leaves. You can also try vacuuming whiteflies. This is a quick and straightforward control for whiteflies at all stages of growth. Be careful not to damage the plant. Simply use your handheld vacuum or vacuum cleaner’s hose attachment to suck up whiteflies every few days. Make sure that any newly hatched whiteflies can’t escape from your vacuum bag. Seal the bag when finished and leave in your freezer if available for 24 hour. You can also use an insecticidal soap spray made from dish soap, water and vegetable oil. Be sure to target the pests on the bottom of leaves, too. Ensure that you apply the spray every 3 days for 9 days to stop future generations.
Prevention: Whiteflies are drawn to the colour yellow, so set up yellow sticky traps. These will help capture whiteflies and help you monitor the pests. The traps alone can protect a few plants, but in larger indoor gardens they work best as an early warning system so you can notice an infestation before it spreads.

Most Common Diseases
Damping Off
Symptoms: Poor germination or germinated seedlings whose stem narrows and turns brown at the soil level resulting in collapsed seedlings. It tends to move in a circular spreading pattern moving from one plant outwards to infect the rest, often wiping out a whole tray of seedlings very shortly after appearing.
Causes: Damping off is caused by a variety of different pathogens found in the environment and usually refers to the rotting of seedlings below the soil surface. In most cases, infected plants will germinate and come up fine, but within a few days they become water-soaked and mushy, fall over at the base and die. Damping off typically occurs when older seed is planted in cold, wet soil with poor drainage. High humidity levels can also encourage its growth.
Control: There is no cure for plants already damping off. Remove the infected plants. Sterilize trays. Replace potting soil. Be sure not to fertilize seedlings until they reach ‘true leaf’ stage.
Prevention: You can prevent damping off with a few tips:
- grow seedlings in warm soil and air
- ensure you are using clean seed
- control over watering and avoid watering in the eventing
- provide adequate air movement around transplants
- remove your plastic cover from seed trays immediately after seeds germinate

Healthy young tomato plants infected by damping-off disease look pinched or cut off at the base of the stem. They wilt, droop over, wither away, and die.
Fungal and Bacterial Leaf Spot
Symptoms: Infected plants have brown or black water-soaked spots on the foliage, sometimes with a yellow halo, usually uniform in size. The spots enlarge and will run together under wet conditions. Under dry conditions the spots have a speckled appearance. As spots become more numerous, entire leaves may yellow, wither and drop.
Causes: Leaf spot is a pathogen-caused fungal leaf spot. Leaf Spot is most active when there is plenty of moisture and warm temperatures.
Control: There is no cure for plants infected. You will want to discard any affected plant materials. Make sure to always disinfect your pruning equipment (one-part bleach to four-parts water) after each cut. Correct the water moisture levels and use an oscillating fan to promote air circulation. Prevention: Prune or stake plants to encourage air circulation or use an oscillating fan. Ensure moisture levels are not too high. Try not to water from above.
Prevention: We add lime to our Earthboxes, in part to add calcium to our potting soil to prevent blossom end rot. You will want to ensure moisture levels are kept even and that too much nitrogen fertilizer is not applied to the soil.

Grey Mold
Symptoms: Grey mold appears as brown patches that eventually become covered in grey or brown fuzzy mold. It is usually found on dead plant materials but may migrate to healthy plants. It is often found near the soil surface or in the densest areas of plant canopy.
Causes: Grey mold is a fungal disease called Botrytis that travels through a garden quickly in damp, cool conditions.
Control: Clean up dead plant debris. There is no control for affected plants, so dispose of all plant materials to prevent further spread.

Powdery Mildew
Symptoms: White to gray powdery coating, especially on young leaves. Blistered areas on leaf edges that causes them to curl upward.
Causes: Powdery mildew is caused by a fungus related to downy mildew called Cleistothecia.
What it does: Symptoms include stunted plant growth, leaf drop and chlorosis (the yellowing of plant tissues). Powdery mildew is a disease that shows up most prominently on new leaf growth.
Control: The fungi flourish in highly humid conditions and where there is little ventilation. The dampness of indoor gardens can be ideal for this fungus. Remove infected plants immediately from the garden. Ensure that there is enough room between plants for that moisture can evaporate. Use an oscillating fan for a few hours every day to create airflow and keep humidity in check.

Root Rot
Symptoms: Plant growth will become stunted, and then plants will wilt and turn yellow. The leaves start to get dull as the plant dies. You can remove the plant from the soil and feel the roots. Most often roots will look black and may fall from the plant when you touch them. Healthy roots may be black or pale but will feel firm and pliable.
Causes: Root rot is caused by too much water and/or soil-borne pathogens. Prolonged exposure to overwatered conditions can cause some of the roots to die back due to a lack of oxygen. The other cause is a fungus I the soil that will flare up after a few repeated situations of over watering.
Control: Ensure that your soil is not over-saturated and allow soil to dry. Your best bet is usually to discard the infected plant and soil and sterilize the growing containers. Some gardeners treat root rot by removing the plant from soil and washing roots under running water and cutting away affected roots. This is more common with established houseplants.

Verticillium
Symptoms: Plant leaves will begin to droop, turn yellow or brown, and begin to fall.
Causes: Verticillium wilt is a fungal disease of many garden plants including trees and shrubs but is most severe in the potato and tomato family. The fungus usually enters via roots, plugs the water moving tissues result in in sudden and permanent wilt in the plant. It damages leaves, stems and the fruit of the plant.
Control: Remove affected plant material immediately and dispose of your soil. You will want to sterilize your growing container before reuse. Prevention:Ensure that you are not re-using soil for similar crops. In our LGT garden you should use fresh soil each year! Make sure that soil is well drained. Ensure growing containers are sterilized each year before use.

Controlling the Issue
So you’ve figured out what’s wrong – now let’s tackle how to make it right!